Skip to Content

How To Install Solar Panels Yourself

Matt describes how he installed a 7KW solar panel system on his roof for $4,000 after tax credits, significantly reducing costs by doing it himself and avoiding professional installation fee

Walkthrough

These are the steps to installing your own solar panels

Background

How it all started

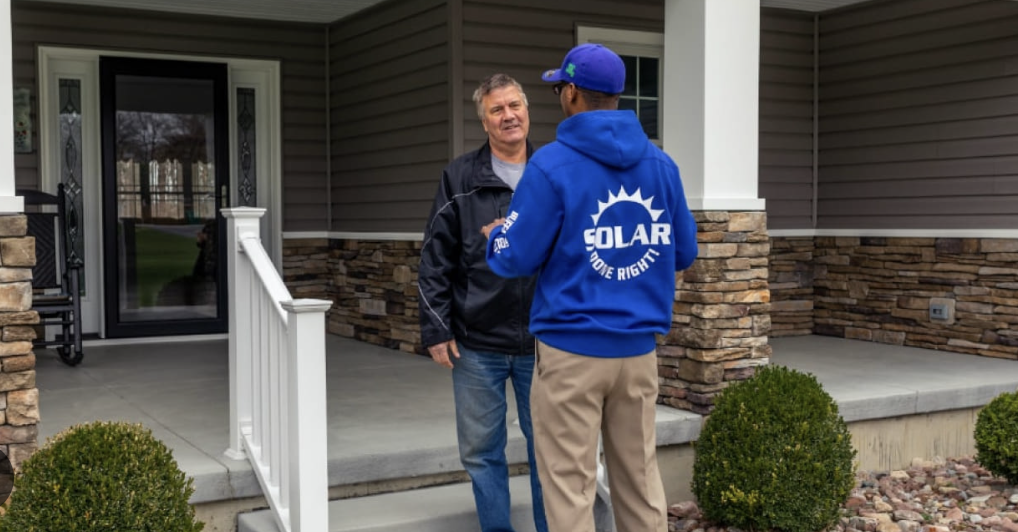
Initial Interest In Solar From Door Knockers

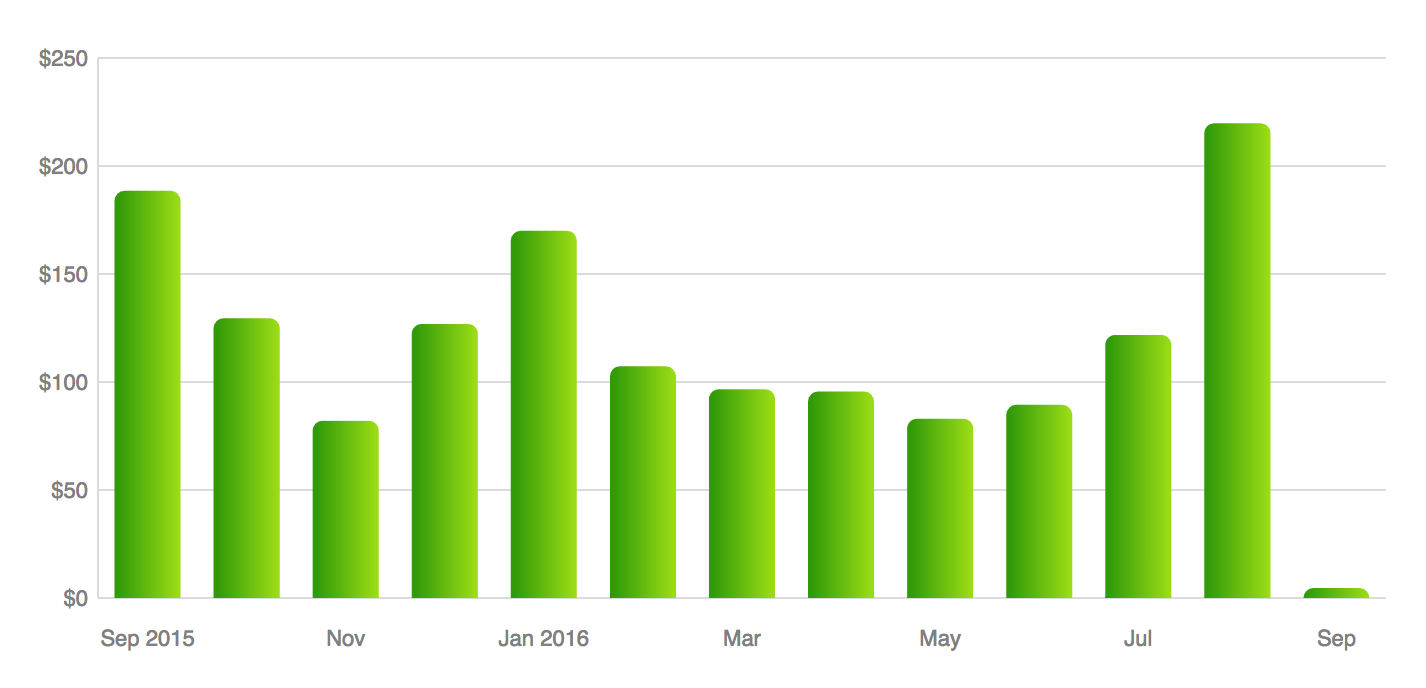
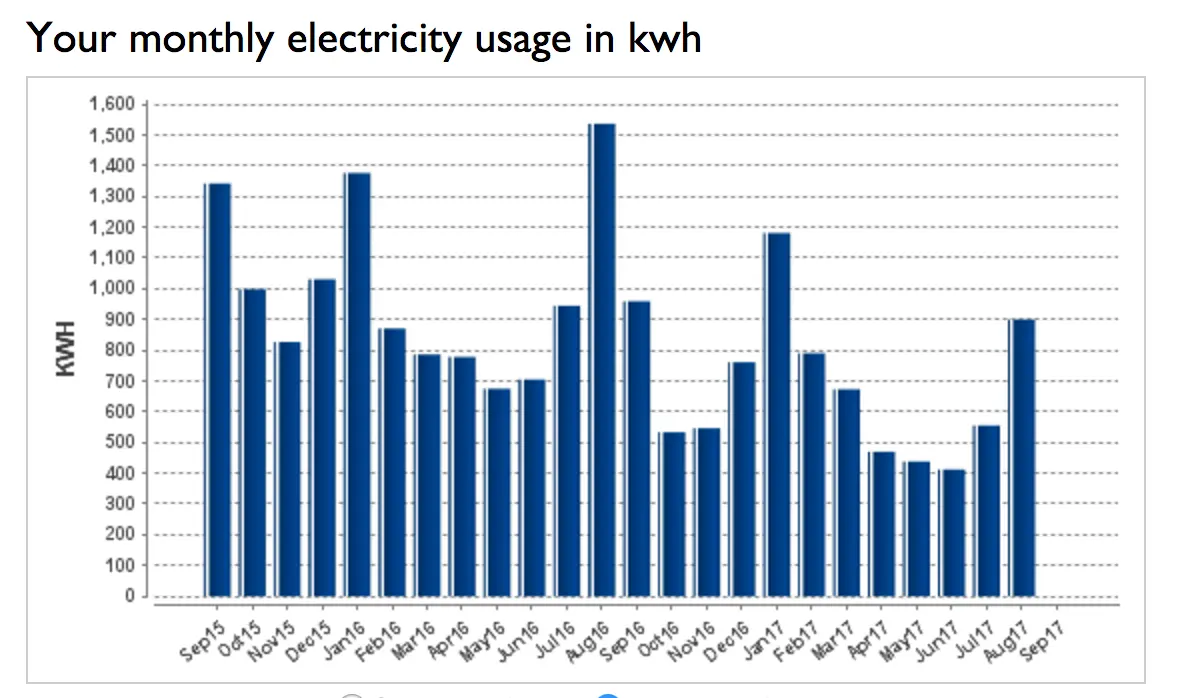
I got interested in installing solar panels on my roof in South Jordan, Utah, not only to save the planet, but also to save money and eliminate any monthly bills I could.  I got some quotes from Vivint SolarLegend Solar, etc.  Most of them quoted me a 7 kilowatt system (which is necessary to produce the 12,000 kilowatt-hours I use in a year for my 3400 square foot home).  Most of them said it would be about $25,000, and after tax credits (federal and state), it would be about $16,000.  This sounded okay, but with my bill of $100-$150 per month, it would have taken about 8-12 years to break even.


Considering Doing It Myself

That is when I started looking into doing it myself.  After some investigation, I discovered it would only cost about $8,000 total, and then $4,000 after tax credits – one-fourth the cost and with a break-even of only 2-3 years!  It is a great time to do it because the costs continue to go down on the panels and equipment, but the tax incentives/credits are still pretty high (but will decrease in 2019), so the overall cost to you as a homeowner is quite low.  This article describes how I did it at this cost.

Plan

Make a plan

Use Design Software

You can plan your project using the Sunny Design Web software – it really nice and comprehensive, and it is free!  It helps you understand how big of a system to get and estimates the power output you will get based on your location, the orientation of your panels, the inverter you use, etc.  


Figuring Out Equipment And Layout

The software also helps to understand what equipment to get, and the optimal way to lay it out (e.g., in my case, I learned that it would be most efficient to do 3 strings of 10 panels each for my 30 panels).  I output this PDF from my project.  You will need some recent bills from your power company to figure out how many kilowatt-hours of power you need per month or year.

Purchase

You should order all the solar panels and equipment since the delivery time is a few weeks and you can be working on the approvals in the meantime.

Panels and Inverter

The main costs are the solar panels ($3,500) and the inverter ($2,700).  I have outlined all my costs at Solar Project Items and Costs.  I purchased most of my solar equipment from Sun Electronics because they had a big auction where Grade A panels were $0.50/watt.  They sell a lot of Grade B and C stuff for about this price normally, and it is basically as good as the Grade A stuff.  You might also want to look at Wholesale Solar as they have decent deals.  I did one big centralized inverter because this way it is cheaper.  If you have a lot of shade (from trees and such), you might want to look at doing micro-inverters (where each panel gets its own inverter), or optimizers and one central inverter, but in my case since I don’t have a lot of shade, I wanted the lowest cost route.

Racking System

I didn’t end up purchasing the metal racking system (to mount the panels to roof) because that would have cost $1,800.  I learned that I could build a racking system from treated lumber, tar, rubber flaps (for protection), and some mounting brackets.

Other Stuff 

I bought everything else at Home Depot, Lowes, eBay, and a couple specialty solar sites.  I get $10 or $15 off $50 purchases (20-30% off) at Lowes using coupons at Renovo Power.

Batteries?

Also, many people ask me about doing batteries.  I wouldn’t recommend it.  Just do the grid-tie (net metering) to keep the costs down.  I would only do the batteries if you have a lot of problems with power availability in your area (blackouts, brownouts, etc.) or you think the end of the world is coming soon.  Batteries just cost more money to maintain and aren’t worth it.  Also, you might have seen the hype about the Tesla Powerwall, but it is 2-3X more expensive than similarly-performing lead acid batteries you can just buy on eBay, and even those make the costs higher than you want.  Also, to get your tax credits, you have to grid-tie, so if you still really want to do batteries, I would do a hybrid system that does grid-tie and batteries.  For this though, you will have to get an inverter that supports it, a charge controller, and the batteries, which will all add thousands of dollars in cost to the project.  If I still haven’t talked you out of it, you can check out doing it yourself by searching for “DIY Powerwall” and save yourself a lot of money by building your own Powerwall using used laptop batteries.

Get Approvals

In my case, I needed to get three approvals – home owners association (HOA) approval, a South Jordan city building permit, and approval from Rocky Mountain Power.

HOA

The HOA approval was pretty easy – I just had to draw up the plans and show where the panels were going to be.  They basically just wanted to make sure they would look nice.  They also prefer that the panels be on faces on the roof that aren’t visible from the front of the house.  Luckily, all the faces of my roof I wanted to install on (the ones facing southwest and southeast) are in the rear.  This takes a few weeks to get approved.  See my HOA Approval Documents.

City Building Permit

For my building permit, I submitted with South Jordan City to get approval, and then once approved I could install.  After installation, I had them come do an inspection and approve it.  This takes a couple weeks to get approved.  The city also required that I have a structural engineer approve the design since it is adding load to my roof.  I just hired a structural for $100 and we did it all through email.  See my Building Permit Approval Documents.

Power Company

Lastly, I had to get approval from Rocky Mountain Power so they will come install the new net meter (which will count forward and backward whether I am contributing to or taking from the grid.  This takes a month or so to get approved.  See my Rocky Mountain Power Net Metering Approval Documents. They also have good details on how to read the net meter.

Install

Installation took a fair amount of time, but not bad.  

Time To Do It Yourself

I estimate about 70 hours total.  I actually installed it all myself, including hoisting the panels up a ladder.  You might want to have another person to help at least with this part.

Considering Paying An Installer

Another consideration is that you may be able to pay someone (i.e., subcontract it out) to do the install for a couple thousand bucks.  If you did this, you would still be quite ahead of paying a professional installer.

Here is a video that walks through most of the installation.


Get Tax Credits and Incentives

You can get a federal tax credit, and in most states, you can get a state tax credit.  You can carry these over for a few years if your tax liability isn’t high enough for it to make sense in one year.

Federal

Federal Solar Tax Credit – just indicate on your tax forms.  This amounts to 30% of the total cost of the project (until 2019 when it starts to reduce from that)

State

Utah State Tax Credit – you have to fill out an online application (which asks for system costs, photos, a signed net metering agreement form, etc.) and then mark on your tax forms.  This credit is 25% of the project costs, up to $2,000.  So, if your project exceeds $8,000, this one caps out there.

Power Company

Rocky Mountain Utah Solar Incentive Program – Rocky Mountain Power also does a lottery.  I tried for two years to get in on it and gave up because your chances of winning are about 1 in 50.  In my case, it would have amounted to about $4,550 (7,000 Watt * $0.65/Watt), so it basically would have made it free for me to install solar.  However, I got tired of playing my odds that way and just wanted to do it.  If you are still on the fence about installing solar, I would at least enter this lottery every year (just takes 10 minutes to fill out the application), and if you happen to win, you can get your system for free (or low-cost if you have a company else install it for you).

Conclusion

Overall, the project was a success and I am saving money every month. 

Glad I Did It

I am glad I did it myself.  My first month (September 2016), my bill was $8.97 (normally my bill in September is about $90), and I overproduced 130 kWh so I have that as a credit to use.  In October, my bill was $8.97, but then I got a $20 credit for the Cooler Keeper program, so I am actually in the black now!  I did deplete my credit a bit down to 65 kWh, so I imagine that will continue to deplete over time.

Hiring Some Parts Out?

I do wonder if you could hire out the labor portion for $2-3K and still come out quite ahead.  I have even considered starting a company installing these on the cheap.  Whether you install them yourself, hire someone else to do just the installation, or even just pay Vivint Solar to do it, I would do it.  You will save money, save the planet, and won’t have to be so strict about turning off lights or turning down the thermostat!

Follow Up and Lessons Learned

I made a follow-up video.  Below, there are also additional details on how much I am saving, as well as lessons I have learned.

It has now been a year since I installed the panels and I want to share how things are going and lessons I have learned.  Everything is going as planned.  I have paid $8.97 per month (fixed cost) every month except for a couple months in Winter, when I had to pay about $30-100 (because my stored up credit had run out).  I went from spending $1,500 on power in a year to $300. Assuming a savings of $1,200 per year, my break-even is a little over three years.


Power Bills

Here is information about my power bills.

September 2015 – September 2016

September 2016 – September 2017

Two-Year Usage History

I am producing 30-45 kW per day as planned, and doing about 11,000 kW per year (of the 12,000 kW we use).

I also got a SMA Webconnect so I can track all the production in charts.  It is really nice and I highly recommend it (even to non-data nerds).  They have a great we app at https://www.sunnyportal.com and also a smartphone app for iOS and Android.


Lessons Learned

These are the lessons I learned if I had it to do all over again.

  • Purchase the inverter on eBay.  I have seen new 6-7 kW inverters on there just like my Sunny Boy for $1500 shipped (and Buy It Now) instead of the $2,700 I paid (I think solar companies make their money on the accessories, not on the panels).  I also may have gotten a bit bigger one (maybe 8-10 kW) and bought it in auction format.  I talked to a guy and he said he got a 12 kW one on there for $1600 shipped!
  • Purchase more panels that are closer and grade B or C and black.  I paid a lot on shipping from Miami ($500), and there are many solar wholesalers in Arizona and California.  I also have seen panels for $0.10-$0.20/watt instead of the $0.50/watt I paid because they are grade B or C, used, or even slightly hail-damaged.  Grade A or not much better and you pay a premium for them.  I also probably would have purchased another 10-20 panels (I still might) and do a fourth string so I over-produce – then I can do things like use electric heaters in the winter, get Bonaire electric window evaporative coolers, and such.  Also, if possible, I would do black-framed panels – they look better.
  • Build racking from strut channel instead of treated lumber.  I saved a lot of money using treated lumber instead of an engineered solar racking system ($130 instead $1,800), but if your city allows you to pass inspection building your own, I would probably build it using strut channel (e.g., Superstrut, Unistrut, etc. – best prices at CED – Consolidated Electrical Distribution).  It would probably have only cost $300 more than the treated lumber and I wouldn’t have to worry it will wear out after 15-20 years, periodically tighten screws (like I do with the lumber), etc.  I would just buy it at Home Depot or Lowes, or ideally find it from some local construction site that has extra (using Craigslist, Facebook, KSL.com, Classifieds, etc.).  Specialty solar stuff is expensive, but you can usually build something from hardware store parts for much less.  I have also been told that QRail from QuickMount is a pretty inexpensive aluminum racking option.
  • Use metal flashing and stainless fasteners.  I should have used metal flashing instead of rubber for the rack mounts.  You can just get some flashing (metal for under the shingles, some big screws, a metal spacer, and some strut channel for the foot and then the bar across and build a nice racking system.  The rubber should work for years.  With the dry climate here, we are probably fine without stainless fasteners, but in wetter climates, it is recommended to use more expensive stainless which galls very easily, and fasteners cold weld.
  • Use better screws.  I used “deck” screws to attach the mounting system to the roof – I should have used stronger “lag” or Spax screws.  This protects against strong winds.
  • Run wire through attic instead of in conduit.  It was just easy to run conduit and I didn’t want to mess with poking holes in my roof, but I probably would just go through the attic next time.  It looks nicer, could have been easier, complies more with code, and may have enabled me to put the inverter in the basement, which is good since they run less efficiently in the heat.  I could have just run conduit from the inverter to the soffit, then j box and transition to mc cable through the attic, and junction or “soladeck” under each panel location.  Running PVC conduit right on the roof as I did is generally not best practice, especially since temperatures can get up to 160 degrees on a roof and may melt the PVC.
  • Run flex conduit better.  I should have run the flex conduit with a drip loop.  It’s a loop that points down, and the point of it is to allow water that runs down the conduit to drip off instead of running up against the connection at the box.
  • Find better way to do copper grounding.  The lugs I used that screwed into the panels were hard to work with, especially once the panels were clamped down.  The screws didn’t fit in the holes well and it was just a pain.
  • Use better stickers.  The stickers I used came off after a year.
  • Account for labor cost on taxes.  I later learned that I could have gotten a higher tax credit if I had also accounted for the labor I put in – I figure that was about 100 hours at maybe $50/hour, so another $5K perhaps would be fair (I have learned the going rate is about $0.60/watt for labor, so this is about right).  Had I done this, along with these other lessons learned, I would have saved another $1300 on my taxes, so it would have only been a total of about $2700 out of pocket, instead of $4K.  I am pretty sure I can still just revise this with the IRS though, and get money back from my 2017 taxes.
  • Find something to get rid of pigeons.  I have been getting pigeons on my roof because they like to nest under the panels, especially in the winter.  I have a neighbor who shoots them for me, but I think I may put some poky metal stuff or maybe wire mesh so they can’t get under there.  I also have heard of some device that makes hawk sounds so it scares the pigeons away – I will have to look into those.
  • Use whole-house surge arrestor.  They get wired into your main panel, run something like $150, and should keep expensive stuff like heat pumps from getting fried if there’s a power surge.
  • Use anti-oxidation goop on all wiring connections that aren’t inside the house.  You coat the exposed copper wire ends with No-Lox (and squish it into the strands) before you install them into terminals/etc. It keeps the copper from corroding over time which, is less of an issue in dry climates, but over the course of many years it could still be a problem. It’s very cheap insurance and you could do it retroactively. Corroded wiring connections cause localized heating, power loss, and excess current draw.
  • Use liquid tight metal flex.  It is has a spiral metal sheath underneath the waterproof outer plastic. It’s like the standard flexible metal conduit you’d use indoors but with a covering of the plastic flex that you used. Aside from giving the wires inside much more protection from physical damage, it’s also MUCH easier to pull wires through it. Disadvantages are cost, it’s harder to cut, and, because it’s metal, it requires grounding bushings on the end(s).
  • When using conduit outdoors, always assume that it’s not waterproof. The NEC requires wet-rated wire in outdoor conduit because it considers conduit to provide physical protection, not waterproofing. It’s not uncommon for conduit to fill partway with water, which isn’t great but it isn’t necessarily a problem either since the code basically assumes that the wire will always be sitting in a pool. The point is to always use wire listed for wet locations (the W in THHWN is for Wet) and to plan things under the assumption that water will get into the conduit. Aside from ease of installation and price, PVC conduit is good because it’s glued together like plumbing, so it’s as watertight as (normal) conduit gets, but one should never assume that any particular installation is truly waterproof.

Another Follow Up After Years

After a couple more years, I wanted to show some charts of my power costs over the past few years (my solar system went live in September 2016):

I did another follow up video after several years.

Here are some charts of my usage after many years.

As you can see, I went from spending about $1,500 per year, to about $200-300 per year.  You can also see that the only months I am not paying the fixed $9 per month are January-March, when my credits have been exhausted for the year (they reset in March).

Start Your Solar Journey Today

Ready to install your own solar panels?  We can help you get started.